WHMCS Module Documentation
For module version 3.0 (April 2016)Content
- Installation
- Create "Servers" Entry
- Create Products
- Examples
- Client Profile
Installation
- Place the contents of the archive you have received in your WHMCS installation directory under "modules/servers" (The PHP files have to be in "modules/servers/multicraft")
- Enable the Multicraft API under "Settings"->"Panel Configuration" in your Multicraft panel
- Create an API key for a user with superuser privileges by going to the user profile and clicking on "Generate API key" in the menu to the left.
Upgrading
The v3 module is not compatible with v2 so you'll have to re-configure the "Module Settings" of all Multicraft products to make sure servers are still provisioned with the correct settings.The Multicraft server ID is now stored in a separate field called "Multicraft Server ID" for each service (previously in the Domain field). To make sure existing services can be suspended/terminated correctly with the new module you can either manually move the ID from the Domain field into the new server ID field or run the following query on your WHMCS database:
INSERT IGNORE INTO mod_multicraft SELECT a.id, domain FROM tblhosting AS a JOIN tblproducts AS b ON a.packageid=b.id WHERE servertype='multicraft' AND CAST(domain AS SIGNED)>0;
You might have to run a module function of the new module first so the mod_multicraft table gets created. Clicking on "Test Connection" in the "Servers" entry should be sufficient.
Changes
Summarized change list since the v2 module:- Added "Test Connection" function - Added multiple settings for fine grained control over the module behavior - Added support for checking daemons in random order - Allow all server properties to be overridden by the module - Don't generate a new password if no new panel user is created - Implemented "best daemon" feature to influence the way a daemon is chosen - Implemented support for variables in server name - Log to WHMCS module log instead of sending log mail - New "default value" feature, allowing custom fields to override module settings without user input - Performance improvements - Store server ID in new database table - Support for configurable options and custom fields for every available setting, allowing great flexibility in terms of user choice and pricing - Use new WHMCS database functions so query errors are logged in WHMCS
Connect WHMCS to Multicraft
The module automatically distributes Minecraft servers over multiple daemons so you only have to create one "Servers" entry in WHMCS.- Create "Servers" entry
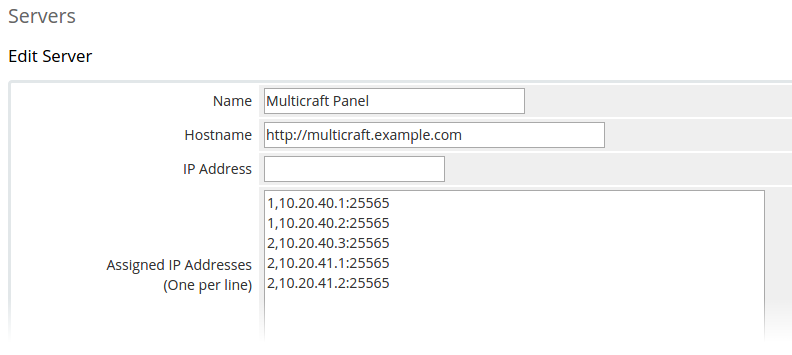
Under "Setup"->"Products/Services"->"Servers", click on "Add New Server" and fill in the fields:- Hostname
Your control panel URL (http://your.address/multicraft) - IP Address
Since every daemon has its own IP this setting is not used - Assigned IP Addresses
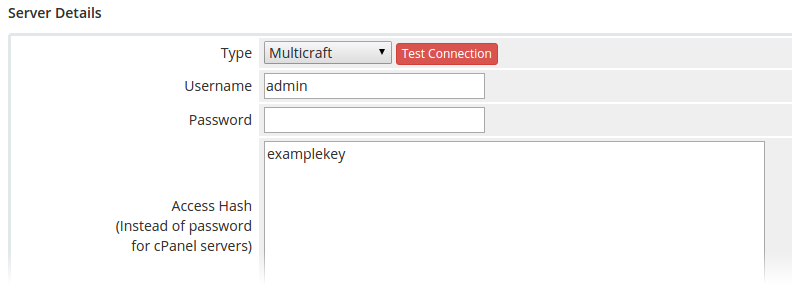
A list of available dedicated IPs in the format DaemonID,IP:Port (e.g.: 1,192.168.1.1:25565). - Type
Set this to "Multicraft" - Username
The name of the user for which you have generated the API key - Access Hash
The API key you have generated for that user
- Hostname
- Create Server Group
Under "Setup"->"Servers", click on "Create New Group" and add the server you just created to this group.
For illustration, here are the two relevant sections of the "Servers" entry:
Create Product
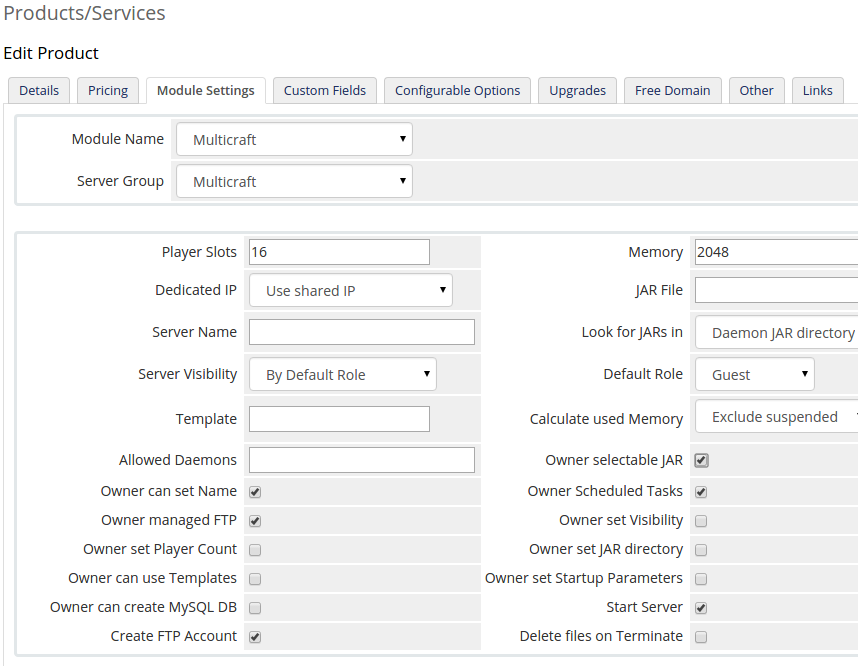
Create a new product under "Setup"->"Products/Services"->"Products/Services". The module related settings are under "Module Settings", everything else is the same as for a standard WHMCS product entry. Please contact WHMCS support if you have any question regarding WHMCS base functionality.Module Settings
- Module Name
Set this to "Multicraft" - Server Group
IMPORTANT: Set this to the server group you created in the previous step - Player Slots
Player slot count for the created server - Memory
Amount of RAM in MB for the created server - Dedicated IP
- Use shared IP
Don't try to assign a dedicated IP - Dedicated IP if available
Try to assign a dedicated IP from the "Assigned IP Addresses" list of the WHMCS "Servers" entry. Continue with a shared IP if no dedicated IP is available - Require dedicated IP
Assign a dedicated IP, fail if no IP is available
- Use shared IP
- Server Name
See name setting below - Calculate used Memory
Whether to include suspended servers when determining if a daemon has enough RAM available for the new server - Allowed Daemons
Restrict available daemons to the daemon IDs listed in this field (comma separated). All daemons are used if this is empty. - Create FTP Account
Whether or not to create a FTP account for the user - Delete files on Terminate
Whether to delete a servers base directory containing all the data related to this server when the WHMCS service is terminated - All other settings are the same as in the Multicraft server settings
Custom Fields
Custom Fields can be used to override the Module Settings as well as set additional settings through user input during the order process. See All Available Settings for a full list of available settings. The name of the Custom Field needs to match the setting name exactly so you can use the Friendly Display Names feature of WHMCS to give it a more friendly name.Using the Default Value Feature documented below you can also override settings without having them exposed to the user.
Example
This will allow customers to choose a panel login username: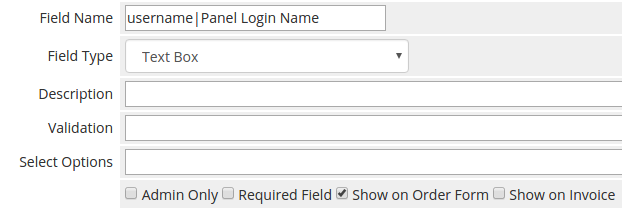
Configurable Options
Configurable Options will override both the Module Settings and Custom Fields. They can be used to make certain settings available as a paid upgrades for example. See All Available Settings for a full list of available settings. The name of the Configurable Option needs to match the setting name exactly so you can use the Friendly Display Names feature of WHMCS to give it a more friendly name.Using the Default Value Feature documented below you can also override settings without having them exposed to the user.
Example
See the Examples below.Default Value Feature
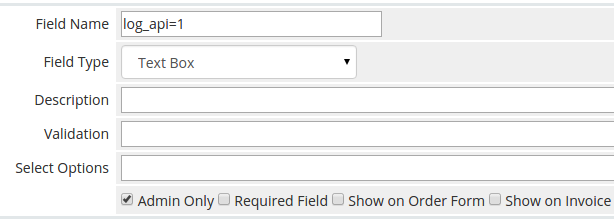
Since the number of settings Multicraft provides exceeds the limit for the WHMCS Module Settings there is a special feature available that allows an arbitrary number of settings to be configured through Custom Fields using a special format.Custom Fields using the format "setting=value" with field type "Text Field" are handled specially by the module. It will set the "setting" to "value" regardless of whether or not a value has been set for this field during the order process or in the service view. Setting these custom fields to "Admin Only" is recommended.
These Default Value Custom Fields can override the Module Settings but they are overridden by any Custom Field or Configurable Option for the same setting.
See All Available Settings for a full list of available settings.
Example
This will configure the product to delete the control panel user ("delete_user" setting) when the service is terminated and make sure the daemon with the most available RAM is used ("use_best_daemon" setting):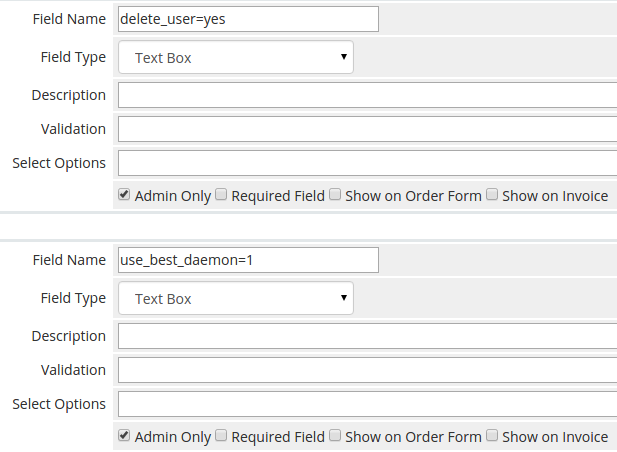
All Available Settings
In addition to the module settings in the products "Module Settings" tab there's a list of settings that can be set through a new "default value" feature, through custom fields and through configurable options. Available settings:| Setting | Description | Value |
|---|---|---|
| General Settings | ||
| allowed_daemons | Same as "Allowed Daemons" in the Module Settings | e.g: 1,2,3 |
| dedicated_ip | Same as "Dedicated IP" in the Module Settings yes = Require dedicated IP, optional = Dedicated IP if available, no = Use shared IP |
yes/optional/no |
| delete_user | If set to "yes" the control panel user owning this server will be deleted when the product is canceled. If there are still servers assigned to this user account it will not be deleted Default: no |
yes/no |
| delete_worlds | Same as "Delete files on Terminate" in the Module Settings | yes/no |
| disable_logging | Disables logging entirely when set to 1 Default: 0 |
0/1 |
| existing_password | This will be set as the service password value when no new panel user is created. This is to prevent generating a new password that is never used since the user might already have changed the password in the panel and we don't override an existing password. Default: Your existing panel password |
Any string or empty |
| include_suspended | Same as "Calculate used Memory" in the Module Settings 0 = Exclude suspended, 1 = Include suspended |
0/1 |
| location | See Server Location or Disk Type Selection | Location Name |
| log_api | Log each call to the Multicraft API with parameters and return values Default: 0 |
0/1 |
| log_verbose | Output each log line separately in addition to the summarized log entry on completion. Useful if the process doesn't complete Default: 0 |
0/1 |
| max_per_daemon | The maximum number of servers that can be created per daemon, 0 for unlimited. Default: 0 |
0-... |
| op_player | When enabled a scheduled task will be created that issues the command "op username" after provisioning the server Default: 1 |
0/1 |
| retry_times | The number of times to retry server termination. Termination can fail if the server is still shutting down. The module will wait for 1 second between each try. Default: 10 |
1-... |
| shuffle_daemons | Check daemons in random order when setting up a server. Can be used to distribute servers evenly instead of filling daemons up sequentially Default: 0 |
0/1 |
| use_best_daemon | When enabled the module will check all daemons and use the one with the most RAM available instead of using the first daemon with enough RAM Default: 0 |
0/1 |
| Server Settings | ||
| announce_save | Announce World Save | |
| autosave | Autosave | |
| autostart | Autostart | |
| crash_check | Crash Detection default = Use default settings, strict = Strict crash detection, basic = Basic crash detection, disable = Disable crash detection |
|
| default_level | Default Role 0 = No Access, 10 = Guest, 20 = User, 30 = Moderator |
0, ..., 30 |
| disk_quota | Disk Space Limit | |
| domain | Domain | |
| jardir | Look for JARs in daemon = Daemon JAR directory, server = Server JAR directory, server_base = Server base directory |
daemon/server/ server_base |
| jarfile | JAR File | |
| kick_delay | Unauthorized Kick Delay | |
| memory | Memory | |
| name | Name Supports parameters: {USERNAME}, {EMAIL}, {IP}, {PORT}, {MEMORY}, {JARFILE}, {TEMPLATE}, {DAEMON}. Default: {USERNAME}'s Minecraft Server |
Server Name |
| players | Player Slots | |
| setup | Combination of: install = Install template on server start, always = Run Setup on every server start, delete = Delete All Server Files Default: "install" when a template is set, otherwise empty |
e.g.: install,always |
| start_memory | Startup Memory | |
| template | The name of the template directory/file to use for this server. If "setup" is not set when a template is set "setup" will be set to "install" Default: empty |
|
| ip, port, dir, world, daemon_id, suspended, prev_jarfile, params | It is not recommended to override these settings | |
| Panel Server Settings | ||
| display_ip | Displayed IP | |
| give_role | Cheat Role | |
| ip_auth_role | IP Auth Role | |
| user_crash_check | Owner configurable Crash Detection | |
| user_ftp | Owner managed FTP | |
| user_jar | Owner selectable JAR | |
| user_jardir | Owner set JAR directory | |
| user_memory | Owner set Server Memory | |
| user_mysql | Owner can create MySQL DB | |
| user_name | Owner can set Name | |
| user_params | Owner set Startup Parameters | |
| user_players | Owner set Player Count | |
| user_schedule | Owner Scheduled Tasks | |
| user_templates | Owner can use Templates | |
| user_visibility | Owner set Visibility | |
| visible | Server Visibility 0 = Owner only, 1 = By Default Role, 2 = Users with Roles only |
0/1/2 |
| user_subdomain | Owner set Subdomain | |
| user_add_ports | Owner can add Ports | |
Examples
Selecting the Daemon by Available Memory
In order for the module to be able to determine the maximum amount of memory available on a daemon you need to have the "totalMemory" setting configured correctly in your multicraft.conf. It must be set to the total amount of memory in MB that you wish to be assigned to Minecraft servers. Note that any changes on your multicraft.conf require either a daemon restart or a reload of the config file under Settings->Operations.The module will go through all daemons and select the first one that has enough free RAM (unless "use_best_daemon" is enabled, in which case it will select the one with the most free RAM). The daemon also needs to have less servers on it than what you set as "max_per_daemon" if this setting has been set.
If no such daemon is found the provisioning will fail.
Dedicated IPs
Dedicated IPs are listed in the WHMCS "Servers" entry under "Assigned IP Addresses" in the following format:DaemonID,IP:PortAn example of such a list with dedicated IPs for the daemons 1 and 3 would be:
1,192.168.1.1
1,192.168.1.2:25565
3,192.168.1.5:25565
3,192.168.1.6:25565
The dedicated IP is removed from the "Assigned IP Addresses" when it is assigned to a server and it will be written back when the server is terminated through WHMCS.
The provisioning process will fail if "Dedicated IP" is set to "Require dedicated IP" and there is no dedicated IP available on any daemon with enough resources. It will continue normally if the setting is set to "Dedicated IP if available".
Configurable Option
To offer dedicated IPs as a configurable option you can configure the option like this: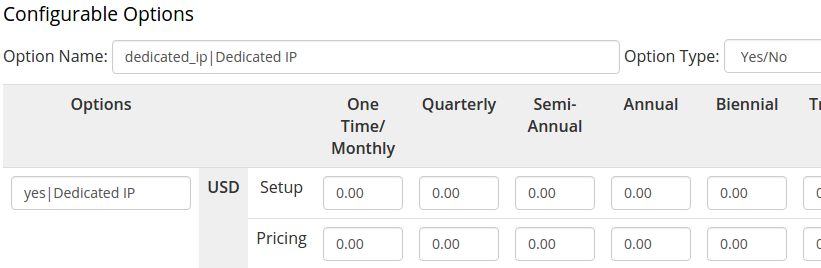
It's also possible to use the other available values for the "dedicated_ip" setting as seen in the table above using a Dropdown option instead.
Setup on Specific Daemons
You can restrict the daemon a product will be provisioned on by specifying a list of allowed daemon IDs in "Allowed Daemons" under the products "Module Settings".If this contains daemon IDs, the module will only consider daemons that match this list. If the list is empty, all daemons will be considered for the new server.
An example value for "Try Daemons" is:
1,3,5This will cause the new server to be set up on one of the daemons 1, 3 or 5.
Server Location or Disk Type Selection
The easiest way to allow users to choose a daemon location or disk type would be to create a configurable option like this: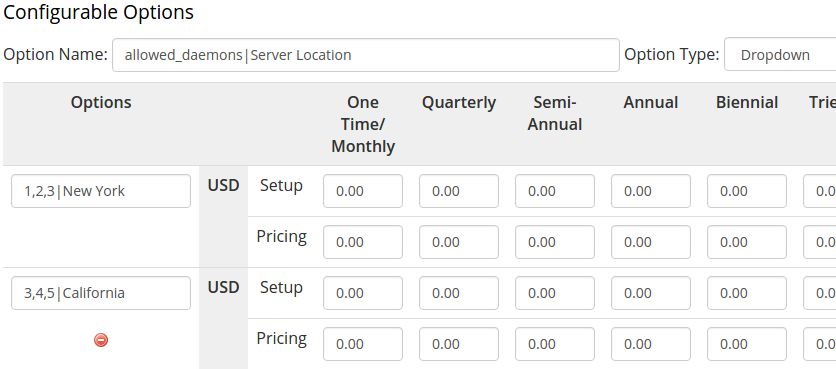
You're listing the daemons of each location or disk type directly in the option.
If you prefer having the location mapping in the products module settings (as with the previous version of the module), you can configure the "Allowed Daemons" setting like this:
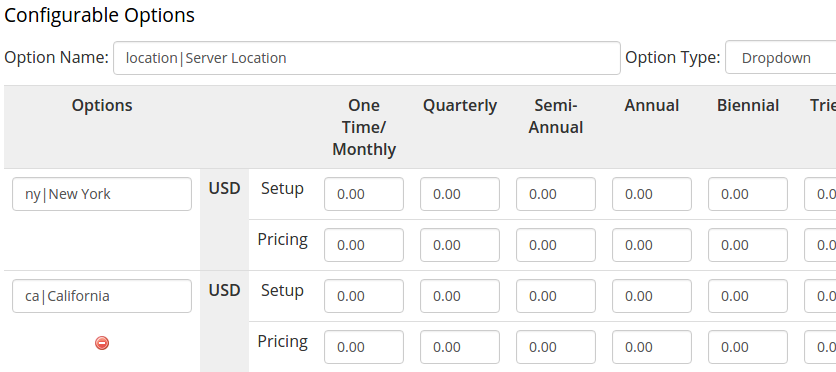
And then create a configurable option using the defined location names:

Now you have the daemons 2 and 3 assigned to the location California, daemons 4 and 5 assigned to location New York and any other location will use daemon 1 and 2.
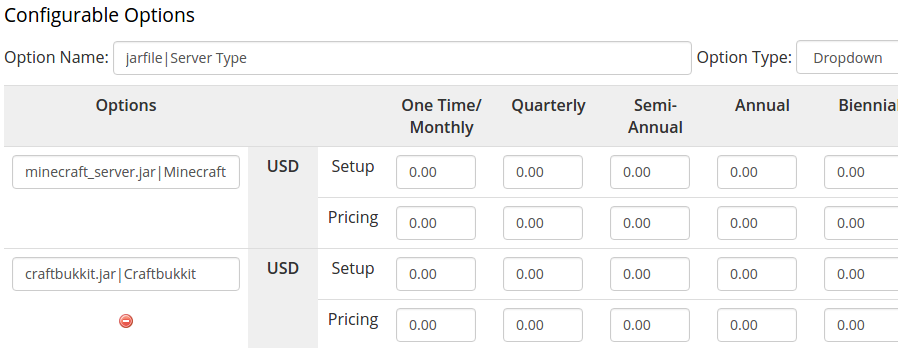
JAR File Selection
Template Selection
This works analogous to the "JAR File Selection" above, just replace "jarfile" with "template" and instead of the JAR names you indicate template names in the options.The "setup" setting will automatically be set to "install" so the template becomes active and runs the next time the server is started. You can also override the "setup" property using the Default Value Feature with combinations of "install", "always", "delete". For example: "install,always" will run the template on every server start, "install,delete" will delete the server files before running the template and "install,always,delete" will delete the server files and re-run the template on every server restart.
Welcome Mail
The following variables are relevant to communicate required information to the customer:- {$service_server_hostname} - The control panel URL
- {$service_dedicated_ip} - The IP:port of the created Minecraft server
- {$multicraft_server_id} - The ID of the created Minecraft server, useful for building links directly to the server view
- {$service_username} - The Multicraft login username
- {$service_password} - The Multicraft login password
Troubleshooting
The module will log all actions to the WHMCS Module log under "Utilities"->"Logs"->"Module Log". Make sure to enable these logs using the button at the top to see the log messages.You can enable more verbose logging or logging of all API calls by creating a "Default Value" custom field as described above with the settings "log_verbose" and "log_api" respectively. For example:
Error: "Invalid API key" or wrong server selected during setup
This can happen because WHMCS assigns the wrong server entry to the product. Make sure you have selected the correct server group in your products under "Module Settings" and check the API key in the Servers entry.If this is the case and you're still seeing the same issue also make sure that the "Fill Type" of your server group(s) is set to "Add to the least full server".
Error: "FAILED: Failed to prepare database"
WHMCS has been unable to initialize the database with a required table for the Multicraft module. You can try running that query yourself on the WHMCS database:create table `mod_multicraft` (`whmcs_service_id` integer primary key, `server_id` integer not null default 0)
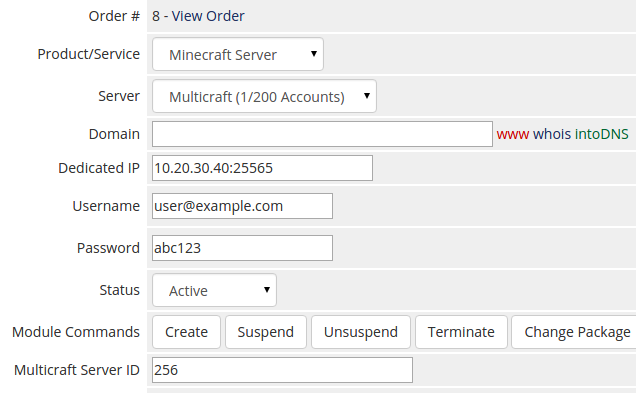
Client Profile
In the client profile service view you can see data for this particular server and control it using the "Module Commands". Special fields used by Multicraft:- Dedicated IP
This is the IP address and port of the Minecraft server. It's not necessarily a dedicated IP - Username
The Multicraft login username - Password
The generated Multicraft login password. Note that if the user changes this in the panel it won't be updated here. This is only the initial password - Multicraft Server ID
This is used to store the server ID so the module knows which server this service is connected to when running terminate and other module commands